With everything that is going on around us during these challenging times, I am reminded how important it is to provide a safe, caring, inclusive, loving and respectful environment at St. Thomas’ Preschool. I know how hard it is to process and figure out how to talk to your children about complicated issues these days. Mine are teenagers/adults and I am still navigating how to discuss these important issues with my children. My 19 year old daughter Lexi asked me a question last week that I had trouble answering. She asked me, “ Mom, I feel like young kids at your preschool love everything and everyone so much. What age do people start caring less about others and the world? Why does that happen?” Two words I hear over and over in the halls and classrooms of St. Thomas Preschool are “Be Kind.” Though those two simple words aren’t an answer, they are a start. I believe, even more so now, in the importance of continuing to teach these words over and over to your children throughout preschool, elementary school, middle school, high school, college and on and on…
My heart has been heavy these past 2 weeks with the recent death of George Floyd and I feel it is my job to create that environment of kindness and love to everyone at STP. I have spent the past week asking myself and others, what can we do at STP? As I spoke to others I received lists and lists of books to send to all of you but then one of my teachers suggested start small, a stepping stone, one book at a time. That felt right to me because these conversations need to start young so we can have a community that is embracing and supportive of all children and families. The book They all saw a cat by Brendan Wenzel was suggested to me and after looking at reviews I thought it was a great book to start with. It teaches a child empathy and how our perceptions change depending on our own experiences and who we are. The cat is seen by humans and all different animals and what is important is that this “seeing” changes with every creature. I read a review about how to talk to your child about this book, which said, “there’s a good chance that the way you see the world isn’t the same way the person next to you does. Everyone, everywhere sees the world different from his or her neighbor. Is it any wonder we have problems? The solution is to try and see things from another person’s view. Now, if the kids think you’re speaking literally or figuratively, it doesn’t really matter. You’ve planted the seed. Or, rather, the book has.”
My goal is to have a book series that will be available on our website and in the classrooms, with a little reflection on how to talk to your child about the book. If you are looking for more resources for your child on empathy, acceptance and tolerance I am happy to provide further information.
If anyone has any suggestions/comments regarding race and diversity, please don’t hesitate to reach out. I want to make conversations like these open to everyone so we all can make a collective effort to create change.
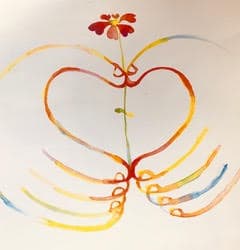
Mmmmmmmm. I stumbled across this wonderful illustration last week in a corner of my desk where I save little things too unusual to just throw away or recycle. The loving image was from a calendar a few years ago, during the month of February, and I smiled looking at the art and remembering why I wanted to hold onto it. Then I flipped the page over to see what my month of February looked like in 2015. That was when I still wrote everything on the calendar on the kitchen wall, before I converted to my iPhone calendar and a planner to tote around with me. There were the many, many scribbles and scrawls of a schedule of a family of five going in a bazillion unimaginable directions…
…a pace and breadth of activity that contrasts so sharply with where we are right now. I just sat and breathed deeply in this realization. For many of us, we have hit a pause in how life “should” be. This can be uncomfortable, scary and disorienting. We may feel sad and disappointed for our children who have been denied the things we’ve hoped for them. AND…It’s here I turn for my best inspiration and reality check: our children. They are the ones so suited to “trust the process” and open our eyes to perspectives that may have never occurred to us, no matter how young they are. This is one of the reasons I relish teaching our STEAM program with them. I say “with” because most of our best curriculum, if we need to use that big word, comes from their deepest questions, or surprising discoveries or even their most surprising fears. They have been the ones who have stopped me in my tracks with comments and questions or requests to do something in a different way than I’d planned. They have been my most valuable teachers. They have planted seeds of joy and delight in whatever theme we’ve explored and have piqued my curiosity to dig deeper into an area that’s thrilled them. So with this in mind, I have two stories to share this week with you….
The first brings to life the image I shared above with you. I feel as if those hands are mine, so carefully tending with the greatest of care (and gratitude for your sharing them with me), your hopeful sprouts growing so bravely towards the sun.
It’s called “Plant a Kiss.”
Maybe you are planting cheery flowers in a pot by your doorstep, or maybe you are planning your first raised vegetable garden…whatever you are planting and cultivating, the most valuable seed to cultivate is ……LOVE….and it spreads! And it’s not invasive!
Maybe you are very new to gardening? Did you know that most anything can be a garden? One of my favorites was in an old pair of my boots. I wonder what unusual things you could find to plant a garden. In this next book, someone just might decide to use their old…tuba! Here’s the link for “Anywhere Farm”:
Planting seeds, no matter how many and no matter where, can be such a beautiful hobby that brings joy in quiet and meaningful ways. We all have the ability and desire to nurture and it brings out the best in each of us. I invite you to try it. See what makes you happy to plant. One of my favorite seed companies is Botanical Interests. Check out the heirloom sunflowers! All sizes up to 12 ft! Maybe a patch of mammoth sunflowers for your family to shelter under, for the birds to enjoy an autumn seed buffet and our much loved and needed pollinators to tickle all summer long with their fuzzy yellow pollen-collecting legs? If you’d like, I have lots of different things I’m able to share from my garden so that’s an option too. Please just reach out to me!
Here’s another idea of something to do as a family…not only is it a fabulous secret place to curl up in the heat of summer but will also give you pick-your-own veggies for dinner. Pole beans twine so well on whatever support you can find…fallen tree branches leaned on each other work just as well as bamboo poles or whatever you have readily available. The flowers are loved by insects and birds (some flower red, a hummingbird magnet) and produce delicious beans for your picking after the flower fades. You can even add another climbing plant seed to intertwine with the beans such as morning glories or hyacinth bean vine that is not edible but grows the COOLEST purple flowers then pods perfect for taking apart with tiny fingers! Heart shaped leaves and blooms linger until the end of fall.
And lastly, since we are focusing on the “process” and seeing where it takes us with curiosity and care, I’ve included a link for many process art ideas to enjoy throughout the summer with your family that are simple in terms of supplies. Please feel free to share photos with me by email to post on our sites. We could host an online art show!
Thank you all for “bean” the wonderful families you are…keep growing, keep hoping, keep looking forward and know I am here for you ….it’s an honor to guide and learn alongside your children.
With big love,
Miss Amy (please keep reading below..more fun!)
P.S…..WHAT FUN it was to laugh with you all and send BIG air hugs during our parade at school last week! After a few chats as you drove by in your wonderfully decorated cars and wide grins, I’ve included a bunch of ideas/activities inspired by you!
The Schuylkill Center for Environmental Education is offering awesome Thursday night LIVEs (on-line): June 4th (7-8pm) is nature trivia!
On Virtual Schuylkill Saturdays (10:30-11am), dive as a family into a new nature topic each week with one of the center’s environmental educators on Facebook Live and continue the learning fun with activities to explore at home.
For more info, see schuylkillcenter.org (you’re welcome for the spelling…hahahah!)
The Barnes Foundation is offering the Barnes From Home Family Art Time. Currently there are several weekly activities posted with details and supplies, for families of all ages, adults included, to create art and learn from the art and objects in the Barnes collection. If you love art, sign up for their weekly “takeout” art lesson email, it’s free. You’ll find a myriad of ideas for art learning and inspiration on their website.
For those of you exploring the wonder of the Earth and all the other planets, if you’d like to create your own solar system with balloons and simple, homemade paper mache paste, here is a great recipe from Red Ted Art! I’ve also tried the paper clay from this site…so much fun.
Redtedart.com (search paper mache paste from flour/paper clay)
PBS.org has featured Michele Obama reading favorite stories during the month of May. The readings (with some special guest appearances) are accessible through the PBS Facebook page and Youtube Channel.
We’ve all heard …..”April showers bring May flowers….”
Well… our May flowers are bound to be amazing with the abundance of showers we’ve had this spring!
In case it is raining again and you are looking for an activity to bring out the giggles and creative juices with your gang at home, here is a place to begin…
This favorite book (yes, I’m sure you know by now that I have LOTS of favorite books!) is sure to elicit silliness…
I wonder WHO is the pizza in your house? What toppings did you choose? Did the pizza laugh and run away after baking? These questions will make much more sense after you enjoy the story!
Now maybe you’d like to make your own REAL pizzas?
Since some ingredients might be challenging to find with less trips to the grocery store, I’ve included two dough recipes that are simple and require just a few ingredients. They are both so easy to put together and making them is a terrific family cooking experience. The dough will be ready even before you decide on your toppings!
Each chef can create their own mini pizzas ….or work together to create one large 12”.
1 package, active dry yeast (or 8 grams or 25oz or 2.25 tsp)
1 tsp sugar
1 cup warm water (110 degrees F)
2.5 cups bread flour (or all purpose flour)
2 tbsp olive oil
1 tsp salt
Preheat oven to 450 degrees.
In a large bowl, stir yeast and sugar into the warm water and let it sit for 5-10 minutes until it looks creamy (here you can watch the yeast come alive!).
When the yeast is frothy, add the flour, salt and oil, and stir until well mixed. At this point, your dough will be loose and messy looking. That’s ok. There’s no need to form a smooth ball like you would with traditional pizza dough recipes.
Let the dough mixture rest for 5 minutes.
Transfer the dough to a lightly floured surface and roll or pat into one 12” crust or 4 individual crusts.
Transfer to a pizza stone or lightly oiled pizza pan.
Spread pizza sauce over crust.
Top with a handful of mozzarella cheese and various other pizza toppings.
Now just bake at 450 degrees for 15-20 minutes (large pizza) or 10-15 minutes for the smaller pizzas! YUM!
How about a pizza cook-off? Who had the most inventive toppings? What treasures did you find hiding in the back of your refrigerator? Maybe you made a breakfast pizza with bacon, eggs and cheese? Maybe a s’more pizza with chocolate, marshmallows and crushed graham crackers? Maybe you skipped the sauce and did all cheeses? I wonder which one you loved the most? Did you close your eyes and try to guess what someone else put on their pizza?
Maybe, just maybe you are in the mood for some warm and toasty homemade soft pretzels instead? Mmmmmm. Those always hit the spot! They feel like a warm hug on the inside. Speaking of hugs, here is another short story if you are feeling like you could use a hug…….
Read here!
Now for the pretzel recipe…
1¾ cup self rising flour (easy to make if you only have all purpose flour, see below)..
1 cup plain greek yogurt
3 tbsp butter (to brush on pretzels)
1 tbsp course salt (to sprinkle on pretzels)
To make self rising flour, sift together 2 cups all purpose flour, 1 tbsp baking powder and 1 tsp salt
For the dough, combine the self rising flour and greek yogurt in a medium bowl and stir until it forms a loose ball. On a lightly floured surface, knead 2-3 minutes to smooth the dough a bit. Divide dough into 8 even pieces. Set aside a bit or two for pretzel bites. Roll a piece of dough into a long rope and fold ends over to form a pretzel. Repeat with remaining pieces. If you prefer to make bites, cut the long rope into 1 inch pieces. The next step is optional but really gives the pretzels that crisp and golden outer shell….
It’s called a baking soda and water bath. (Silly pretzels taking a bath!) Combine ½ cup boiling water and 1 tbsp baking soda in a heat- proof bowl. Submerge each pretzel, one at a time, for several seconds before placing on a baking stone or cookie sheet. Brush pretzels with melted butter and sprinkle with salt. Bake for 20 minutes at 375 degrees for pretzels, and 8-10 minutes at 425 degrees for pretzel bites.
Maybe you’ll sprinkle them with cinnamon sugar or garlic and herb butter instead? Great for dipping in peanut butter, hummus or ranch dressing! Or anything else your heart desires.
And not to be missed would be making your own pizza dipping sauce, perfect on your homemade crust or for dipping your pretzels. Here you can add your own flair as well. Using any canned tomato sauce or chopped tomatoes, add an assortment of chopped veggies from your fridge. In school we’ve had such fun cutting carrots, zucchini and yellow squash (some cut very easily with plastic knives to keep little hands safe or are fun to grate). Add your favorite spices and dried herbs and blend in a blender or with a blending stick and simmer in a pot on your stove until the taste tickles your fancy. Pesto sauce is another option!
Maybe you’d like to open your own family pizza shop! How about making some menus with your art supplies? What toppings would you put on the menu? Are you selling whole pizzas or can your family buy just a slice? How many slices are in your pizzas? Can you create a few model pizzas on paper with removable toppings? (paper plates are a sure bet to make paper pizzas!) Maybe there is cardboard in your recycling to make a pizza box for delivery to the yard, the upstairs…where do you deliver your pizzas in your house? Maybe you’ll create some pizza art to mail to your friends and family to tell them that they have a “pizza” your heart!
Well all of you sure do have a BIG “PIZZA” my heart!!! I think of you all the time and send you happy vibes. Grab your aprons and spoons and let’s get cooking! Feel free to email me any pictures of your pizza adventures or pop a menu you create in the mail so I can order a slice!
Hey, want to hear a joke about pizza?
Never mind, it’s too cheesy! Hahahahahaha
Just remember, no matter how you “slice it”…you’re awesome!
Be well, be peaceful, take good care of each other.
Here is a photo of one of my favorite pillows. I smile looking at it every day.
It’s such a beautiful and gentle reminder to pause, look up, notice all that’s around me and savor it and say…..thanks.
Have you ever listened to Louis Armstrong’s version of “What a Wonderful World”? Mmmmm….give it a go…grab your kids and dance….
What a gift to focus on this week….the Earth all around us! Today, Wednesday, April 22nd is the 50th anniversary of the celebration of Earth Day! I wonder how you will celebrate it with your families? There are endless options, so simple and right at our fingertips… (in my mind and heart EVERY day is earth day!)
Here is a silly reading of Todd Parr’s “The Earth Book” to get you started. Warning: we will be talking about underwear so get ready to giggle!
There are SOOOOOO many fabulous books I just couldn’t stop at one this week so I have another by the unbelievable author and illustrator Oliver Jeffers. I have no words to capture the talent of this man. “Stuck,” “ The Incredible Book Eating Boy,” “How to Catch a Star,” “This Moose is Mine,” “Once Upon an Alphabet” are just a few of his others. Please read as many as possible!
My choice in celebration of our most wonderful Earth is… “Here We Are, Notes for Living on Planet Earth.” Here it is. Settle in and enjoy.
How about a few earth jokes?
What’s brown and sticky? A stick!
How can you tell that the ocean is friendly? It waves!
What kind of shorts do clouds wear? Thunderwear!
A huge discovery this week: Oliver Jeffers reads one of his very own books in person, live on Instagram every day! And, in the spirit of Earth Day, he has offered this family challenge on Twitter:
He also just released a movie version of the book I read above this week on Apple TV. It is a wonder! I took this photo with his inspiration.
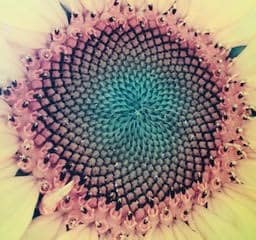
I wonder if you can tell me what it is? The patterns of nature are breathtaking. Do you see any patterns emerging? When you look closely can you feel movement? This is Mother Nature at her best! What patterns are you finding in nature outside and inside your home?
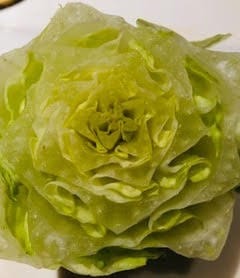
Perhaps in celebration of Earth Day you getting down and dirty in the garden and planting some new friends? Maybe thinking about starting a vegetable garden? Can you guess which vegetable this is? (another amazing nature pattern I just love…) Hey, if you dipped this into paint, what cool prints you could make! Hint, try celery too….
(It’s the base of a head of romaine!)
If you are able to swap perennials safely with neighbors, that’s a great way to love our earth. Maybe you are starting a pollinator garden for our beloved bees, butterflies and other insects? If you need a little help where to find plants, here are a few simple thoughts that support small local folks and are focused on “native” plants for our area.
Marano Gardens in Fort Washington. On Bethlehem Pike between St. Thomas’ and Zake’s Cakes. You can pull into the lot and call two cell numbers listed on the sign and Joe and Mary will take good care of you, safely during this time. Joe grows much from his own seeds and my children went to preschool with all of his!
Primex in Glenside has just started curbside pick up. Check out their website…a caring, family owned business for over 75 years! I have learned so very much from them as well as have enjoyed the wonderful plants I’ve purchased there.
One I’ve just learned about but have not visited, Edge of the Woods in Orefield, PA. (near Allentown) . All native plants and well organized for curbside pickup.
How about finding ways to use what we have on hand to create joy at home? Well…I happen to love finding new ways to use my recycling! How about stacking your red solo cups for a game of “wrecking ball?” (this site has really hopeful ideas for bringing joy into the lives of struggling children). This is a video from Life is Good Playmakers.
I personally love a plastic cup, or yogurt cup stacking game in the theme of speed stacking….have you ever tried it? If you look up speed stacking it will give you an idea. We’ve just had lots of fun doing it at home! Or building with cups and popsicle sticks or even strips of cardboard from shipping boxes. What huge towering structure can you create? Maybe you will be inspired to create a pinwheel “wind turbine” to explore how we create energy by harnessing the wind.
Oh, and my other secret collection is bottle caps from milk jugs, seltzer bottles, actually any plastic bottle lids I can salvage. Can you imaging gluing a mosaic with them? Even just sorting by color, size, shape…they are so cool. Stringing them on wire or string would be beautiful hanging from a tree branch. Or, they do make awesome wheels for homemade cardboard cars (on skewers and powered by balloons). Phew. So many possibilities! AND, any aluminum cans from canned tomatoes, etc….offer the best opportunities for robot and magnet building for our little ones…if you have an oxo can opener, it removes lids of tin cans without sharp edges so you can stack away safely with loads of cans. Pull off a bunch of your fridge magnets and let your imagination soar! Then explore your home with your fridge magnets and see what sticks where….and why! Magnetism is another superpower that powers so many aspects of our everyday life…
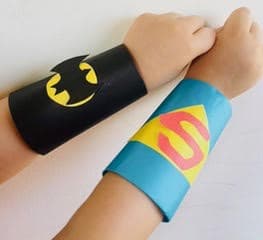
Well, I hope you know how I think of all of you as “superheros” of our Earth. Thank you for being so thoughtful of it and doing your best, whatever it is, to love it the way you are able. Maybe you’d like to make some superhero arm cuffs from the center of the toilet paper rolls (I hope you all have been able to find some TP J). Here is a picture…..
And…..I’m excited to tell you that we are redesigning a way to have our “Superhero Night” even though we are all at home right now! Please look for email this week. Think about what you might wear that makes you feel like a superhero. Your Halloween costume? Maybe your Star Wars footie pjs? Or your dance tights? We have superheroes all around us….doing many, many things to help us all and keep us safe. You are ALL superheroes doing what you are doing, wherever and however you are doing it. Thank you!
“Most big transformations come about from the hundreds of tiny, almost imperceptible, steps we take along the way.” Lori Gottlieb
Wishing you laughter and joy in your moments together. Stayed tuned for our Superhero Night email!
Big hugs (by air for now) xoxo, Miss Amy
P.S. If your family would love to take a trip to take in the wonder of this amazing planet Earth we are so fortunate to call home, check out this article in Insider.com. Using the google earth app, you can take in the sights of over 32 of our national parks, without causing any pollution! It’s breathtaking.
If you’d like some book suggestions for reading about the climate and global warming, I found this list helpful. In addition to this, “Our House is on Fire: Scenes of a Family and a Planet in Crisis” by Greta Thunberg is a courageous and hopeful read.
I hope your Easter, Passover, or Spring time celebration brought you joy in unexpected ways! Maybe you had the chance to bring to life new traditions to celebrate your holiday together…I’d love to hear about what you did. Were eggs hidden in your house or yard? Were they laid by a chicken? Did you know that chicken are not the only ones who lay eggs? Here is a poem from the beginning of another favorite book of mine…called “Chicken Aren’t the Only Ones” by Ruth Heller.
Chickens lay the eggs you buy, The eggs you boil or fry or dye… Or leave alone so you can see What grew inside naturally. Chickens aren’t the only ones. Every bird wild or tame Does the same!
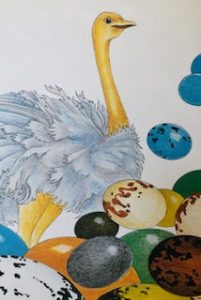
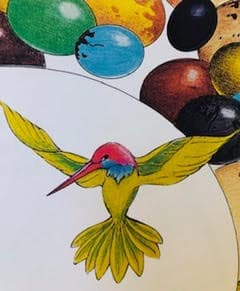
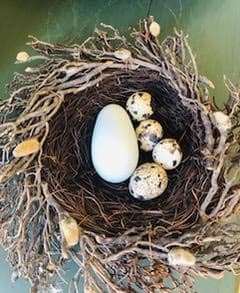
I wonder if you know which bird lays the largest egg? (hint: this bird does not fly but can run quite fast and its egg would be so heavy you would need both hands to hold it!)
How about the smallest egg? (hint: this tiny bird’s wings move so quickly it is hard to see them, and the nest is the size of a golf ball)
Try not to peek until you guess, I’ve pictured them below…
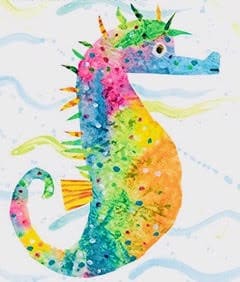
How about this? The mother seahorse actually lays her eggs inside the father’s pouch (see it on his stomach below? It’s dark yellow in this beautiful Eric Carle illustration from “Mister Seahorse”) and he keeps them safe and warm there until they hatch! Amazing!
Here’s an idea of how to use your plastic Easter eggs for a family game. If you have small play animals, insects or reptiles you can use them…but if not, draw small pictures or have your older siblings or family members write the names of some of your favorite animals/insects/reptiles on small pieces of scrap paper that can be folded to fit inside the each egg. They can add some too! Put them together in a basket and each person take an egg and guess if what is written inside comes from an egg or a live mother. The one with the most eggs, who guessed correctly, is the winner. You all win because you learned more amazing facts about egg laying and the animal and insect world! Just wait until you look up what some of the eggs look like….
Cool word fact: (more from the poem) Chickens aren’t the only ones. There’s no more to discuss. Everyone who lays and egg is called…. OVIPAROUS!
Eggs are delicious to eat and are great for your body! Just think, an egg comes inside its very own container, its shell! It’s packed with protein and can be cooked and eaten in many ways.
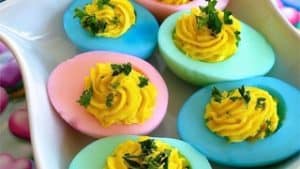
In case you have extra hard boiled eggs from you egg dyeing last week, here is a recipe for deviled eggs that’s hands-on fun for all…
12 hard boiled eggs
1/3 cup plain greek yogurt or mayo
1 tablespoon lemon juice
2 teaspoons Dijon mustard
½ teaspoon garlic powder
Sea salt and fresh ground pepper
Slice eggs in half and scoop out the yolks. Here’s the fun hands on part….instead of mixing the scooped yolks and ingredients above in a bowl, put them in a ziplock bag or several little ziplock bags, so our young chefs can smoosh them with their hands. You may have to tweek the proportions above depending upon how many chefs you have and how many eggs in a bag. It feels soooo good….take a taste and add more of what you need. When you are happy with your smooshing, cut a small slice off the corner of the bag and Voila! Your young chef can pipe the yolk mixture right back into the hardened egg white! Or onto a cracker, or …..
They look festive sprinkled with paprika or chopped garden herbs…
This recipe even dyed the egg whites with food coloring…
Are you thinking of Dr. Seuss?
Some other mix-ins to try:
Mashed avocado
Pickle relish
Worchester sauce
Hot sauce
Soft cheese (such as goat or feta)
And everything bagel seasoning on top is delish!
And if you have extra raw eggs, here is another recipe that works wonderfully for just about any meal. They are simple to make ahead and freeze too.
Egg Muffins:
1 tablespoon olive oil
salt and pepper
6 eggs lightly beaten
6 ounces of your favorite cheese shredded or crumbled
Approximately 2 cups your favorite mix-ins (such as): cooked spinach, onion, cubed ham, crumbled bacon, cooked crumbled sausage, cooked mushrooms…what else can you dream up?
Preheat oven to 375 degrees
Coat a muffin tin with nonstick cooking spray
Add mix-ins of your choice to the lightly beaten egg and divide evenly among the 12 muffin cups.
Bake until a toothpick inserted in the center of the muffin comes out clean, about 25 minutes.
Cool slightly before removing from muffin tin. Muffins should come out smoothly.
Muffins store easily in the fridge for 4 days or can be frozen in a single layer on a plate for 30 minutes before transferring to a freezer safe bag. Re-heat in a microwave oven for 1 minute. YUM!
I’ve included two EGGS-tra special book readings for you this week….one geared for a younger (preschool) audience, “First the Egg” by author/illustrator Laura Vaccaro Seeger and another if you have older siblings who would enjoy a longer, beautifully illustrated story by Patricia Polacco …”Rechenka’s Eggs.”
Spoiler alert…there is a special guest appearance for the first reading by another one of my furry friends!
Happy Spring Break to all of you! The warm sun is shining, the earth is greening and I hope this email finds you and your family “nesting” well. It was such fun last week to read a book together and I love one of the book titles I shared with you so much I thought I’d read it in a video for you this week. Here is the link! Do you know where I am sitting while I am reading this to you?
I’ve been thinking about the amazing and beautiful birds that live in the nests we explored last week. Every morning when I wake up and take my four-legged friends for a walk, I hear the voices of so many birds all around me. I’ve started to recognize some of their songs. In this week’s story, you’ll hear, in human words, how the birds’ songs sound to the author. Some are so silly! Have you heard the orange-breasted robin singing “cheerily cheer up! My tree makes syrup! Syrup so sweet! ? I wonder if you could make up your own song you’d sing at sunrise or in the evening…and if you put it into words, what those words would say? (This makes much more sense after you read the story with me!)
On my walks and in my yard I’ve had the wonderful luck of finding several beautiful feathers from the birds in my area. Here are some of them…
Do they look the same? Do some look different? Did you know that you can tell just by looking at a feather where it came from on a bird’s body?
Most of these feathers came from the outer parts, the wings of a bird. They are stiff and offer support for flight. The big fluffy feather was from under the outer wings and is soft and wide to catch air close to the bird’s body and traps heat to keep the bird warm when it’s chilly. All the bird’s feathers together are called “plumage.” If you love birds as much as I do, maybe you’d like to take a look at Cornell University’s Bird Academy website. You can find it at academy.allaboutbirds.org. There is much to take in here…if you’d just like to take a quick peek about feathers geared for young people, go right to academy.allaboutbirds.org/features/all-about-feathers/.
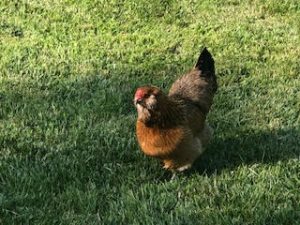
Some of you have met my most favorite feathered friend, Elvira. She came to school last spring for a visit and you fed her delicious chicken treats…dried mealworms! Many of you thought they looked like Rice Krispies. Just this week she made something to show you because she misses you…
Do you know which one she made for you? Hint: It’s the color of the sky on a perfectly sunny day. Her breed of chicken, called an Araucana is known for their lovely blue eggs. Blue eggs? Well, just the outer shell is blue. When you crack it open, it looks very similar to other eggs. She also has puffy feathers that jut out from under her cheeks that make her look like she has a mustache and beard!
Are you ready for an Egg-cellent trick? Here is Mr. Chris, my husband, showing you one of his many talents. Please note, he is using a metal pie plate for this trick! It will take flight. A small metal pizza pan, round metal cake pan or bottom of a spring form pan will work as a substitute. “Wing it” and give it a try!
Speaking of eggs, maybe you would like to color some eggs at home. Some of you may hard boil them before you do.
Can you tell which eggs are hard boiled and which are raw, or uncooked? It can be tricky…. try spinning them on a table. Do you see one move differently or more smoothly than the other? I wonder why? Did you guess which one was which? Did you know that eggs can breathe? It’s true! A egg has thousands (that is a BIG number) of pores in its outer shell just like you have in your skin. If you gently put a raw egg in a glass of water and watch for a few minutes, you should begin to see little air bubbles forming on the shell. This process helps developing chicks (in eggs that are fertilized) clean the air inside their shell! And, if you happen to put a raw egg that has gone bad into a glass of water it would not sink to the bottom …. it would float on top! A rotten egg for sure.
Here are some ideas to color your eggs at home with food or other natural things you may have on hand: (if you color on the egg first with a white or light crayon, you can make a pattern that the dye will resist.)
Naturally Dyed Easter Eggs
Per cup of water use the following:
1 cup chopped purple cabbage = blue on white eggs, green on brown eggs
1 cup red onion skins = lavender or red eggs
1 cup yellow onion skins = orange on white eggs, rusty red on brown eggs
1 cup shredded beets = pink on white eggs, maroon on brown eggs
2 tablespoons ground turmeric = yellow eggs
1 bag Red Zinger tea = lavender eggs
Add one tablespoon white vinegar to every cup of strained dye liquid.
For every dozen eggs, plan on using at least four cups of dye liquid.
Vinegar, hot water and food coloring works wonders too.
In a very small glass, mix one cup of very hot water with several drops of food coloring and one tsp of vinegar. Hold the egg gently under the water with a toothpick until you are happy with the color. Feel free to add a few extra drops of color if needed. Allow to dry on a cookie rack. If you’d like to try marbleizing them, make another small glass of a darker color than your original one and add one tbsp of olive oil to create swirls and bubbles on top of the colored water. Gently place your dry colored egg in this glass and swirl and roll the egg. Remove it when you like your marbled pattern and dry again on a cookie rack. Lots of conversation starters here about why oil and water do not mix, blending color, shades of lighter and darker.
If you would like to make decorative eggs another way that builds strong hands for little people, try cutting out egg shapes in various sizes from cardboard cereal or pasta boxes or paper plates. Using a small piece of aluminum foil, wrap the egg in foil and lightly brush with glue. Decorate with small pieces of colored paper, magazine paper, fabric, ribbon, yarn or buttons…let your creativity run wild! You could do one with all nature items. String them together to make a banner, or use a short ring cut from a paper towel roll as a stand to display on your family table.
Wishing you peace and a lovely holiday with friends and family as we all find new and inventive ways to celebrate together.
During this time when we are all “nesting” in our homes (AND fabulous spring is awakening all around us!) I thought it would be fun to spend some time thinking about nests: how we nest, both inside our homes and outside as well. Maybe you’ve created a new cozy nook to read stories each day, maybe you’ve cleaned out a closet to reveal a perfect hiding spot to curl up with stuffed animals, maybe you’ve noticed a gentle morning dove constructing a nest in a sheltered spot outside your window in preparation for her eggs. Maybe you’ve discovered a paper wasp nest from last summer in a nearby shrub, easy to spot before the spring leaves unfurl. Nests are all around us, in the air, in the ground, some obvious, some hidden in plain sight. I wonder what you can spot where you are and where you explore outside?
For extra fun, I’ve recorded my reading a favorite nest story….”Mama Built A Little Nest” by Jennifer Ward. You can watch and listen to it here (if you hear the bark of someone helping me with the story, it is my friend Blue…here is a picture of her. I’m sure you’ll hear her in more stories!).
A few other lovely books related to this topic are: (and may be available on Audible, free now for children to listen or your library ebooks for children)
“Have you Heard the Nesting Bird” by Rita Gray
“A Nest is Noisy” by Dianna Hutts Aston
“An Egg is Quiet” by Dianna Hutts Aston
This week I encourage you to explore with your children what a nest means to you….what does it do? Who makes it? What is it made from? What goes in it? Where is it built? There are many things to wonder about nests….
Maybe you could construct one together inside.
Maybe you could create nests outside.
Maybe you could find ways to create nests during snack time (picking up pretzel sticks with just your mouth or your toes is a silly way to get a bird
perspective on nest building and cooked spaghetti is always fun to explore with little hands).
Maybe you could find or create something that goes in your nest.
If it’s an egg, how big or small is it? What does it look like? What will hatch out of it? Lots of rich vocabulary here!
To help our bird friends with their nest building, here are a few simple things we can do from home that are free:
Clean out your hairbrush and tuck the hair outside in a bush or tree. Birds love to weave it into their nests for strength and warmth.
Collect your dryer lint and tuck it into a clementine net/mesh bag and hang in a protected spot from a tree limb. Can you imagine if you were a bird and discovered that soft material to cuddle your young?
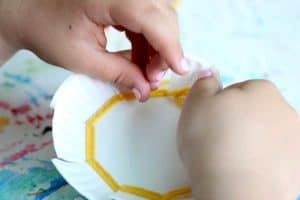
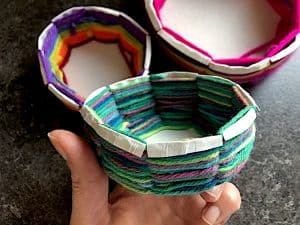
Maybe you would like to try a weaving “nest” project as a family using simple items you most likely have on hand. Using small paper plates and yarn or string of your choosing, here is an idea: (See pictures and instructions below) AND (if you don’t have paper plates, a circle of cardboard cut from a cereal box or other pliable cardboard works just fine). An alternative if your child is very young is to take a small rectangle of cardboard, cut a few slits on the top and bottom, wrap string from top to bottom of the rectangle to create a simple “loom” and let your child weave found objects such a ribbon pieces, string, feathers, plants, flowers, etc under and over the loom strings. A large loom made from found sticks and string could be an ongoing project in your backyard!
Please send any pictures to my email [email protected], I’d love to see them!
Happy, happy weaving and nesting…we are all woven together and all of our interests, gifts, and uniquenesses make our woven communities the colorful places they are.
Much love,
Miss Amy
How to Weave a Paper Plate Bowl:
Supplies:
paper plate
pencil
something round to trace
yarn
scissors
glue and paintbrush (for inside base of bowl)
Instructions:
1. Before you start weaving, you’ll need to prepare your paper plate.
2. Trace a circle in the center of your paper plate. This will be the base of your bowl.
3. Next, make an uneven number of marks, evenly spaced, around the edge of the paper plate. Then draw a straight line to connect each mark to the circle that you drew.
4. Cut: Cut along each line, stopping at the circle that you drew. Now, make cuts on either side of each cut to form a V.
5. Fold each section at the pencil circle line and bend the sections up to form shape of your bowl. If any of the sections overlap, trim to make the V wider so there’s no overlap when the bowl is formed (see video).
6. Now it’s time to begin weaving! Slip a piece of yarn between one of the cuts, leaving a tail, which you can hold down with your thumb while you get started. Weave in and out of the cuts, around and around the bowl. NOTE: Keep the sections of your bowl folded upwards as you weave. If you flatten them down, your weaving will not resemble a bowl.
Occasionally stop to assess your work and to push your yarn down if need be to ensure the paper plate isn’t visible through your weaving.
7. To change to a new colour, snip your yarn, leaving a tail, and tie on a new piece of yarn, leaving another tail. You can trim these tails and tuck them in when you finish weaving.
8. To finish your weaving, stop weaving about 1/8 of an inch away from the top of the bowl. Cut your yarn and leave a tail which you will tuck in shortly.
9. Fold the remaining top edge of each section down and crease firmly to create the bowl’s rim and to ensure your weaving doesn’t slip off the top of the bowl.
10. Time to decorate the inside base! Brush some glue over the inside base of the bowl, and use a long strand of yarn to create a spiral to cover the base of the bowl. Using a pencil, tuck in any loose tails of yarn.
Your woven bowl is complete and now ready to store trinkets and treasures in!
Have you heard of the “Wood Wide Web?” How trees are able to communicate beneath the soil with the help of friendly fungal root connections? (Yay mushrooms!) Trees communicate with us above the ground in many ways as well…they are nature’s clock revealing the time of year, and trunk growth and bark patterns divulge age and histories. Trees are generous, giving us all and other life on earth the gift of clean air to breathe, shade and shelter, food, medicine, wood for many useful things as well as for a cozy fire to keep us warm! How can we follow their lead and be more like them, generous, kind and caring for our community? How can we take better care of them? This was the theme that STPS students explored this fall, both inside our steam classroom and out on our church campus. We took full advantage of the numerous beautiful, mature and diverse trees gracing our hillside and observed and listened to the stories they were speaking! Did you know that the amazing tree on our Two’s playground is the same species alive when the dinosaurs roamed on our planet?
Just before our holiday break, STPS students rolled up their sleeves and jumped whole-heartedly into the world of making paint with natural items such as colorful edible berries, spices, wood ash, vegetables, and even mud! Why, you ask?
If we lived as native people in our area did many, many years ago, we respected and observed our wild animals and nature carefully. They would teach us ways to gather food, to create warmth and shelter and help us to discover how to use what we could find in our surroundings to celebrate the seasons and special occasions. Each team of four or five students investigated a distinct “mystery item from nature” before poking, crushing and pulverizing it with a willow branch tool; transforming it into sublime colors then painted onto watercolor paper with feathers, moss and pine branch brushes. The result was a beautiful mosaic of native paintings (hanging in the school hallway), each a work of art on its own and together a masterpiece. Just like our STPS students!
A special note: The younger classes enjoyed mixing their own two shades of paint and had the extra fun of cooking and eating their own wild blueberry jam!
Shhhhhhh……our seeds are sleeping….snug inside their seed coats, just waiting for spring to awaken them!
This is the fun the S.T.P. students engaged in during their May steam adventure. To the tune of “Peanut, Peanut Butter and Jelly,” we all sang and danced the Earth’s special recipe for our food: Soil, seed, sun and water.
Using “A Seed is Sleepy,” a wonderful and beautifully illustrated book by Dianna Hutts Aston and Sylvia Long, we investigated the many unique qualities of seeds….their various shapes, sizes, colors as well as how adventurous they are, how far they are able to travel, how inventive they are in hitching a ride on our shoe laces or in other ways… As soil scientists we got down and dirty and dug soil samples as a team from different areas around our school and took a close look at what each team found. Worms, mealy bugs, larvae, rocks, sand, clay, sticks….we discovered that soil has many components and needs many of them to be healthy and feed our seeds and plants. Using strips of recycled newspaper, we made decomposable plant pot homes for our mammoth sunflower seeds which we planted with the recipe we learned: soil, seed, sun and water! The tiny pots, watered and ready to go into the garden accompanied each student home during the last few days of school. Fingers crossed we did a thorough job of waking up our seeds…if we did, there will be lovely 8 foot or larger sunflowers smiling in many family gardens at the end of summer!
In April the Steam room was transformed into a buzzing honeybee hive where each colony: yellow, red, purple, orange, blue and green groups were busy as bees performing the many vital jobs honeybees do each day, We collected pollen from the stamens of lilies, alstroemeria and other actual wildflowers with cotton balls before putting our proboscis to the test as nectar collectors!
We used pipettes to collect water (our version of nectar) from paper flowers blooming throughout the room to fill our egg carton honeycomb. Fanning our bee wings, we demonstrated the miracle of how honeybees turn nectar into honey. We waggled to our sister bees to communicate where to find the best flowers to visit. We were nurse bees feeding the growing larvae while our brother drone bees assisted our queen in laying 2,000 eggs as queens must lay every day! We investigated a honey super section of a box hive borrowed from a beekeeper and marveled at the perfectly formed hexagons of last seasons’ honeycomb. We concluded our “un-beelievable” adventure by wearing a beekeeper’s helmet and netting and calmed our colony with a smoker as beekeepers do to extract honey from their hives. “Hive Five” to the honeybees, the pollination sensations who help put the fruit, vegetables and much of the food we love on our table!
Want to learn more about honeybees? There are many terrific books and resources, a few favorites are:
Non-Discrimination Policy: St Thomas’ Preschool accepts children irrespective a child’s race, color, sex, age, religious creed, national origin, ancestry, gender or disability. In addition, we maintain non-discrimination in services without regard to an individual’s race, color, sex, age, religious creed, national origin (including limited English proficiency), ancestry, gender or disability.
Due to staffing shortages from Covid positive cases and coming off of a holiday season, STP will be closed January 3-7. This is with the hopes of lessening the spread and the goal to keep our classrooms open longer.
 Mmmmmmmm. I stumbled across this wonderful illustration last week in a corner of my desk where I save little things too unusual to just throw away or recycle. The loving image was from a calendar a few years ago, during the month of February, and I smiled looking at the art and remembering why I wanted to hold onto it. Then I flipped the page over to see what my month of February looked like in 2015. That was when I still wrote everything on the calendar on the kitchen wall, before I converted to my iPhone calendar and a planner to tote around with me. There were the many, many scribbles and scrawls of a schedule of a family of five going in a bazillion unimaginable directions…
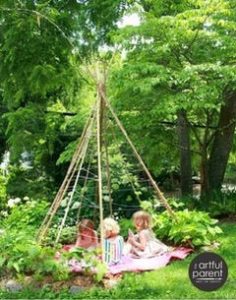 Here’s another idea of something to do as a family…not only is it a fabulous secret place to curl up in the heat of summer but will also give you pick-your-own veggies for dinner. Pole beans twine so well on whatever support you can find…fallen tree branches leaned on each other work just as well as bamboo poles or whatever you have readily available. The flowers are loved by insects and birds (some flower red, a hummingbird magnet) and produce delicious beans for your picking after the flower fades. You can even add another climbing plant seed to intertwine with the beans such as morning glories or hyacinth bean vine that is not edible but grows the COOLEST purple flowers then pods perfect for taking apart with tiny fingers! Heart shaped leaves and blooms linger until the end of fall.
 Since some ingredients might be challenging to find with less trips to the grocery store, I’ve included two dough recipes that are simple and require just a few ingredients. They are both so easy to put together and making them is a terrific family cooking experience. The dough will be ready even before you decide on your toppings!
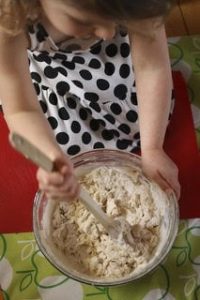
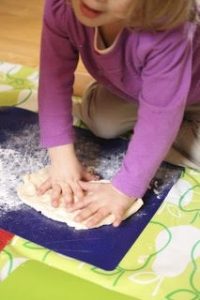 Now just bake at 450 degrees for 15-20 minutes (large pizza) or 10-15 minutes for the smaller pizzas! YUM!

 If you would like to make decorative eggs another way that builds strong hands for little people, try cutting out egg shapes in various sizes from cardboard cereal or pasta boxes or paper plates. Using a small piece of aluminum foil, wrap the egg in foil and lightly brush with glue. Decorate with small pieces of colored paper, magazine paper, fabric, ribbon, yarn or buttons…let your creativity run wild! You could do one with all nature items. String them together to make a banner, or use a short ring cut from a paper towel roll as a stand to display on your family table.