During this time when we are all “nesting” in our homes (AND fabulous spring is awakening all around us!) I thought it would be fun to spend some time thinking about nests: how we nest, both inside our homes and outside as well. Maybe you’ve created a new cozy nook to read stories each day, maybe you’ve cleaned out a closet to reveal a perfect hiding spot to curl up with stuffed animals, maybe you’ve noticed a gentle morning dove constructing a nest in a sheltered spot outside your window in preparation for her eggs. Maybe you’ve discovered a paper wasp nest from last summer in a nearby shrub, easy to spot before the spring leaves unfurl. Nests are all around us, in the air, in the ground, some obvious, some hidden in plain sight. I wonder what you can spot where you are and where you explore outside?
For extra fun, I’ve recorded my reading a favorite nest story….”Mama Built A Little Nest” by Jennifer Ward. You can watch and listen to it here (if you hear the bark of someone helping me with the story, it is my friend Blue…here is a picture of her. I’m sure you’ll hear her in more stories!).

A few other lovely books related to this topic are: (and may be available on Audible, free now for children to listen or your library ebooks for children)
- “Have you Heard the Nesting Bird” by Rita Gray
- “A Nest is Noisy” by Dianna Hutts Aston
- “An Egg is Quiet” by Dianna Hutts Aston
This week I encourage you to explore with your children what a nest means to you….what does it do? Who makes it? What is it made from? What goes in it? Where is it built? There are many things to wonder about nests….
Maybe you could construct one together inside.
Maybe you could create nests outside.
Maybe you could find ways to create nests during snack time (picking up pretzel sticks with just your mouth or your toes is a silly way to get a bird
perspective on nest building and cooked spaghetti is always fun to explore with little hands).
Maybe you could find or create something that goes in your nest.
If it’s an egg, how big or small is it? What does it look like? What will hatch out of it? Lots of rich vocabulary here!
To help our bird friends with their nest building, here are a few simple things we can do from home that are free:
Clean out your hairbrush and tuck the hair outside in a bush or tree. Birds love to weave it into their nests for strength and warmth.
Collect your dryer lint and tuck it into a clementine net/mesh bag and hang in a protected spot from a tree limb. Can you imagine if you were a bird and discovered that soft material to cuddle your young?
Maybe you would like to try a weaving “nest” project as a family using simple items you most likely have on hand. Using small paper plates and yarn or string of your choosing, here is an idea: (See pictures and instructions below) AND (if you don’t have paper plates, a circle of cardboard cut from a cereal box or other pliable cardboard works just fine). An alternative if your child is very young is to take a small rectangle of cardboard, cut a few slits on the top and bottom, wrap string from top to bottom of the rectangle to create a simple “loom” and let your child weave found objects such a ribbon pieces, string, feathers, plants, flowers, etc under and over the loom strings. A large loom made from found sticks and string could be an ongoing project in your backyard!
Please send any pictures to my email amyroak@verizon.net, I’d love to see them!
Happy, happy weaving and nesting…we are all woven together and all of our interests, gifts, and uniquenesses make our woven communities the colorful places they are.
Much love,
Miss Amy
How to Weave a Paper Plate Bowl:
Supplies:
- paper plate
- pencil
- something round to trace
- yarn
- scissors
- glue and paintbrush (for inside base of bowl)
Instructions:
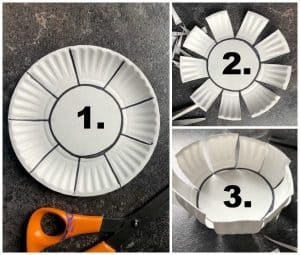
1. Before you start weaving, you’ll need to prepare your paper plate.
2. Trace a circle in the center of your paper plate. This will be the base of your bowl.
3. Next, make an uneven number of marks, evenly spaced, around the edge of the paper plate. Then draw a straight line to connect each mark to the circle that you drew.
4. Cut: Cut along each line, stopping at the circle that you drew. Now, make cuts on either side of each cut to form a V.
5. Fold each section at the pencil circle line and bend the sections up to form shape of your bowl. If any of the sections overlap, trim to make the V wider so there’s no overlap when the bowl is formed (see video).
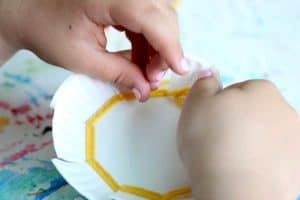
6. Now it’s time to begin weaving! Slip a piece of yarn between one of the cuts, leaving a tail, which you can hold down with your thumb while you get started. Weave in and out of the cuts, around and around the bowl. NOTE: Keep the sections of your bowl folded upwards as you weave. If you flatten them down, your weaving will not resemble a bowl.
Occasionally stop to assess your work and to push your yarn down if need be to ensure the paper plate isn’t visible through your weaving.
7. To change to a new colour, snip your yarn, leaving a tail, and tie on a new piece of yarn, leaving another tail. You can trim these tails and tuck them in when you finish weaving.
8. To finish your weaving, stop weaving about 1/8 of an inch away from the top of the bowl. Cut your yarn and leave a tail which you will tuck in shortly.
9. Fold the remaining top edge of each section down and crease firmly to create the bowl’s rim and to ensure your weaving doesn’t slip off the top of the bowl.
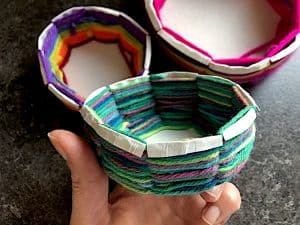
10. Time to decorate the inside base! Brush some glue over the inside base of the bowl, and use a long strand of yarn to create a spiral to cover the base of the bowl. Using a pencil, tuck in any loose tails of yarn.

Your woven bowl is complete and now ready to store trinkets and treasures in!